Installing Bosun for production
Introduction
Bosun is (description from official site) an open-source, MIT licensed, monitoring and alerting system by Stack Exchange.
Bosun installation usually consists of:
- Bosun server (single static binary written in Go)
- Backend(s): Opentsdb, Graphite or ElasticSearch with Logstash schema
- scollector agent for gathering system metrics
We’ll focus on installing Bosun with OpenTSDB backend as it’s currently best supported, although Bosun team tries it’s best not to be heavily dependent on it.
What we’ll do
Disclaimer: this is an example installation, it’s insecure, not tuned and most likely ineffective to run continuously. Also it’ll cost real money to play with (according to my calculations the procedure will take less than an hour and it’s $0.36 USD per one). Feel free to explore the result and convert my scripts/configurations for your environment.
I’ll guide you through: installing HBase, OpenTSDB and Bosun on an example infrastructure in DigitalOcean. Instructions were prepared for unix-like system in mind, i.e. recent GNU/Linux or MacOSX system.
We, sysadmins, should strive for maximum automation and repeatable consistent operations. That is why this guide includes Terraform and Ansible tools that’ll automagically transform this task from boring and error prone to easy and fun. You’ll need DigitalOcean account with positive balance (shameless plug: if you don’t already have one here’s my referral DO link).
Installing Terraform: go to Terraform download page , download and unzip files somewhere into your $PATH.
Installing Ansible: official guide here.
Install Git and clone this repo:
git clone git@github.com:dimamedvedev/bosun-install-example.git
Let’s start with the most intimidating part - HBase.
Installing HBase
Hadoop is well known for it’s weight and complexity, no wonder project mascot is an elephant. Installing it by hand is cumbersome to say the least. I’ll describe Apache Ambari method, although Cloudera’s distribution is also fine.
You’ll need 5 hosts with preferably CentOS/RHEL 6.5.
- First host is for Apache Ambari itself, it may be slightly less powerful (let’s call it
ambari). - Second is for NameNode, SecondaryNameNode and monitoring services. It may be low on disk space. (
bosun-store00). - Everything else is for Hadoop data nodes and HBase regions (
bosun-store01,bosun-store02,bosun-store03).
Creating droplets
First generate new SSH key (or use existing one):
cd bosun-example-install
./generate-ssh-key.sh
copy/paste last script output line to export $TF_VAR_ssh_fingerprint shell environment variable that Terraform will use to setup droplets access.
Generate DigitalOcean token here and export it as a shell variable too like this:
export TF_VAR_do_token="0000000111111112222222..."
Everything’s ready for droplets creation, run terraform plan to check everything and then:
terraform apply
It’ll take around a minute, next type in ./gen_ansible_inventory.sh to create Ansible inventory file.
Prepare droplets for Apache Ambari
Ansible is an agent-less configuration management solution working via SSH. There are few so named playbooks in playbooks directory that’ll do all boring stuff.
First, install Ambari repository, ambari-agent and ntpd on all droplets for Ambari to use. Installing agent should be optional but for some unknown reason (bug?) provision fails without it.
ansible-playbook --private-key=files/id_rsa -i inventory ./playbooks/common.yml
install Ambari server
ansible-playbook --private-key=files/id_rsa -i inventory ./playbooks/ambari.yml
Connect via SSH to ambari server, it’s ip is in ./inventory and ./hosts files
ssh -i ./files/id_rsa root@$(grep ambari ./hosts | awk '{print $1}')
ambari-server setup
And choose default options, start ambari-server /etc/init.d/ambari-server start and open http://ambari-server-ip-here:8080, login as admin:admin, you may need to wait a bit for server to initialize.
Install Hadoop in Apache Ambari GUI
Apache Ambari is an easy way to manage a lot of Hadoop services, I’ll choose rather basic setup just to get things running. No HA/DR and no security too.
Press Launch Install Wizard, name your cluster, choose distribution, insert
bosun-store00
bosun-store01
bosun-store02
bosun-store03
into Target Hosts field and select files/id_rsa key via Browse button. Press Next and ignore Transparent Huge Pages with IPTables for a now.
Choose HDFS, HBase, Zookeeper and Ambari Metrics.
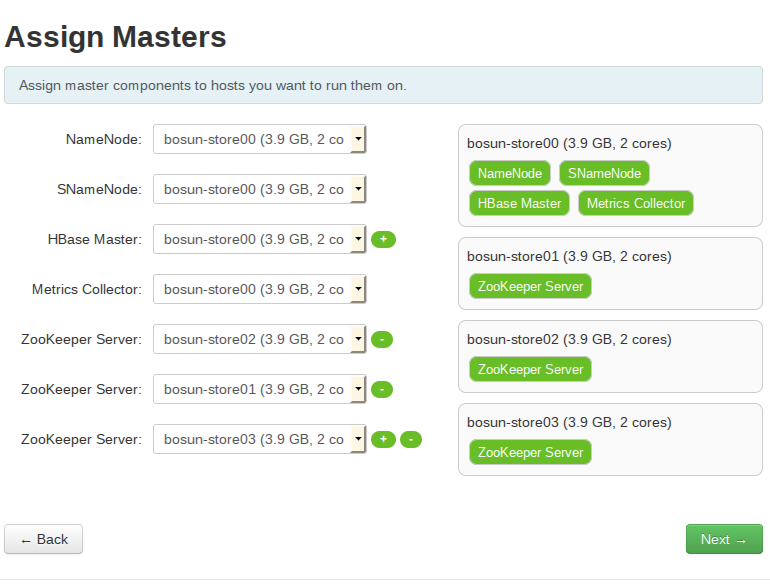
Assign masters:
- bosun-store00 - NameNode, SNameNode, HBase Master
- bosun-store01-03 - ZooKeeper Server
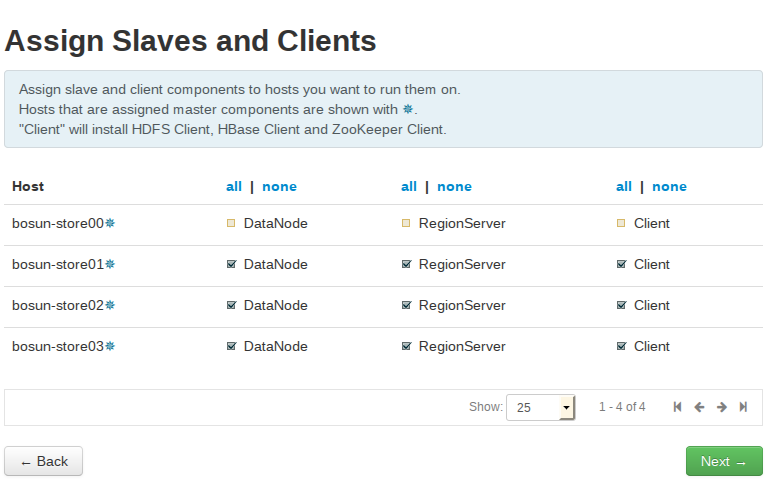
 Assign all Data Nodes and Region Servers to bosun-store01-03 droplets.
 Proceed to
 Install, this step will take around 10 minutes.
Create OpenTSDB tables in HBase
Congratulate yourself with successful Hadoop install. Then proceed to running Ansible again to install OpenTSDB on HBase nodes, we wont run OpenTSDB there, it’s only needed to create necessary tables. You should run ./create_opentsdb_tables.sh once. Make sure to read this script, GZ compression is explicitly required for Bosun to work will save you quite a bit on disk space and data retrieval latency (thanks, Victor Boschi!).
ansible-playbook --private-key=files/id_rsa -i inventory ./playbooks/bosun-store.yml
ssh -i ./files/id_rsa root@$(grep bosun-store01 ./hosts | awk '{print $1}')
cd /root
./create_opentsdb_tables.sh
Install OpenTSDB and Bosun
OpenTSDB may be run on several nodes, but for the purposes of this guide it’ll be installed on the same host as Bosun. Another Ansible playbook will
- Install Java
- Install OpenTSDB from an RPM hosted on GitHub
- Generate
opentsdb.confthat’ll include ZooKeeper servers fromzookeepergroup defined in Ansible inventory, for some reason only IP addresses work - Install Bosun, provide a simplest config file
- Install Runit from packagecloud.io repo
- Run Bosun through Runit
If everything is right then you can open http://bosun-server-ip-here:8070/items and see that there’s already some data flowing. You can play around, see how it works, test how HBase behaves etc. After that destroying droplets is a simple:
terraform destroy
Conclusion
I hope that this guide has shown you that installing Bosun in a very basic configuration is actually a rather easy thing to do. Also Bosun is a bleeding edge software, I may very well update this post several times.
I’m still undecided on what to write next. Some ideas:
- Securing Bosun installation: firewall, TLS, Auth/z
- Configuring Hadoop HA
- Using tsdbrelay in case Bosun is down
- Bosun in a Chef environment
Feel free to vote in comments. You can also get in touch on slack channel.